

©2015 -


UPGRADING THE MACBOOK PRO 15 (model 2011)
Chad’s Blog April 2014
I finally came to a point that my hard drive is no longer going to meet my needs both on speed and disk space. I am a power user on virtualization where I ran simultaneous OS (a mix of Linux, Solaris UNIX, Windows Server 2012) to test various software and configurations. Running these virtual instances can easily consume my 16gb RAM and at times it would have some heavy swapping which in turn results to slow performance of the system. I thought that it is now time for an SSD upgrade.
Enter Crucial M500 SSD. It had the best price/gigabyte at the time.
Here’s the manufacturer’s description:
Adaptive Thermal Protection -
Hardware Data Encryption -
Capacity (Unformatted): 960GB
Interface: SATA 6Gb/s (SATA 3GB/s compatible)
Sustained Sequential Read up to (128k transfer): 500MB/s
Sustained Sequential Write up to (128k transfer): 400MB/s
Random Read up to (4k transfer): 80,000 IOPS
Random Write up to (4k transfer): 80,000 IOPS
Form Factor: 2.5-
NAND: 20nm Micron MLC NND
Life Expectancy: 1.2 million hours mean time to failure (MTTF)
Endurance: 72TB total bytes written (TBW), equal to 40GB per day for 5 years
Operating Temperature: 0°C to 70°C
Compliance: RoHS, CE, FCC, UL, BSMI, C-
Firmware: Field upgradable firmware
Product Health Monitoring: Self-
I am long been a Crucial product user mostly on memory DIMMs for all home computers, laptops, and Sun workstations. Through the years, I can attest that their products are of good quality. This is my first time to use their SSD and I expect the same level of reliability and quality that I once knew.
Blog

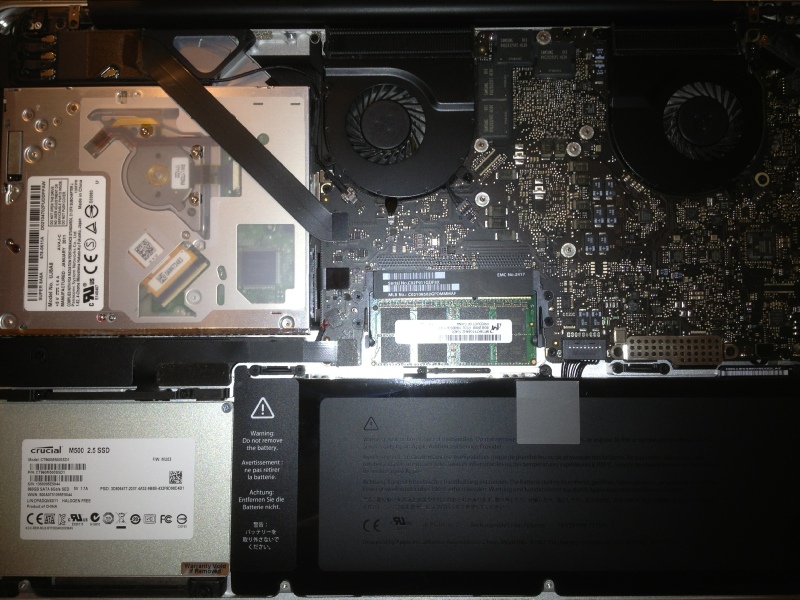
The final assembly with the SSD installed is pictured on the left. To those who are curious with the Macbook Pro 15 board layout, here’s my brief tour:
What you are looking at is the underside of the motherboard with -
- 2 CPU fans at the top half to the right to cool off the Intel i7 quad core CPU and the Radeon GPU.
- At the mid section is the 16gb RAM (2 x 8gb Crucial 1333Mhz DDR)
- Black battery enclosure at the bottom right
- Top left is the DVD SuperDrive
- Bottom left is the 960gb Crucial m500 SSD
Now that I had the SSD in place, the next step is to install the Mac OS X. But first, if you are doing this yourself, ensure that you put back the aluminum cover before you start anything with your OS install.
Once the cover is in place, I went on with the following bootup steps:
- Ensure that the Macbook Pro is plugged on the AC outlet to make sure that power is supplied for the entire OS install process.
- Plug your Mac OS X bootable USB into the USB slot on the side.
- Power-
on the computer while holding the “option” key. When presented with which device to boot, select the USB and a Mac OS X install will commence.
There are some prep tasks that I need to take prior to installing the SSD. It is essential that I backup all my data stored in my current hard drive. This includes not just the Mac OS files and its installed application software but also my Windows files stored at the bootcamp partition. Since these are two different operating system partitions, I would backup the Mac OS files using the Time Machine through an external drive formatted with Mac OS Extended (journaled) file system, then for my Windows, I would copy all my critical files onto a separate external drive. Also, I need to gather all Windows software installers with their license keys including the Windows operating system installer itself. All these I need to prepare for the installation of two operating systems onto an empty brand new SSD.
When you purchase a Macbook Pro (as brand new), it usually comes with a Mac OS X installer disk. Mine was the Snow Leopard version (10.6). Since Apple now has offered for free their latest operating system starting with Mavericks version (10.9), this will be a great opportunity to upgrade also my Mac OS X. But first I need to research and make sure that all my applications running at Snow Leopard can still work with the latest Mac OS X. Once I ensure that all my applications were upgraded to the version level to support the new Mac OS, then it is time to prepare a bootable drive (8gb USB stick) for the latest Mac OS X. A helpful step-
Once I got the bootable USB of the Mac OS X ready, I need to do a final backup onto the Time Machine. Once that’s done, I went on to open my Macbook Pro to upgrade the internal storage hard drive with the new SSD.
In the middle of the Mac OS X install, I was prompted with an option to restore from a Time Machine which I acknowledged and selected all file types including applications. The entire process took me about 2 hrs with the one that took longer is the part of the Time Machine restore coming from an external hard drive (slow device, hehe). When all is done, the nice thing that I fully appreciated is that -
The next thing I did was to install Windows as bootcamp partition. The Mac OS X has a bootcamp utility which has guided me through the repartition of the SSD. During the process, it did prompt me with the Macbook device drivers for Windows which I provided through my second DVD disk that came with the box of my Macbook Pro. The Windows installation took me much longer than the Mac OS X install simply because it involves re-
All-
