
©2015 -


Information Technology


How To Install Oracle 12c Database Software
This installation guideline is intended for users who never had the experience to install an Oracle 12c database software in a Solaris 11 UNIX.
In this particular demonstration, I am installing a database software for use with a monitoring application.
I hope that this will be helpful for you to understand the concepts behind the installation process.
Table Of Contents
Build the Oracle Base Directory
Create Environment Script For Oracle Database User
Download Database Software (optional)
Install The Oracle Database Software
1. Create a resource management project for the database.
Oracle database requires to have extensive shared memory setting reserved for its use. In most Unix and Linux systems, usually these parameters are being set at the operating system kernel level which requires a reboot of the computer for the adjustments to take effect. In Solaris, this reboot is no longer required because user environments are now compartmentalized through Containers and Project resource management. Through Projects, you can now define kernel parameter settings that is specific to each user. And any adjustments in the project will take effect immediately through re-
NOTE: The project below will cause to reserve 10gb of shared memory for any user that utilizes this project.
You may adjust max-
projadd -
-
-
2. Create required OS groups.
orainst is the installer group.
oradba is the database administrator group.
oraoper is the database operator group.
groupadd -
groupadd -
groupadd -
3. Create user
Proceed to create the user oradb with a primary group of orainst and membership to groups -
useradd -
-
BUILD THE ORACLE BASE DIRECTORY
An ORACLE_BASE directory is a 3-
# mkdir -
# chown -
CREATE ENVIRONMENT SCRIPT FOR ORACLE DATABASE USER
The Oracle software usually requires a shell environment variable settings to define a basic configuration of a system.
The essential environment variables that need to be set are:
ORACLE_BASE This is a 3-
ORACLE_HOME This is a multi-
ORACLE_SID This is a system identifier also known as instance name that acts as a “tag” to identify which process belongs to what database.
ORACLE_UNQNAME This is associated to a database name.
The rest of the variables are more of an extension to further define or influence the configuration of the software.
The sample script below is intended to work for a bash shell environment.
Using the standard vi editor, create the following script with its contents as demonstrated below. To save file and quit editor, hit the keys as enclosed with brackets [esc] [w] [q].
su -
vi oraenv_oemdb.sh
ORACLE_SID=OMRDB ; export ORACLE_SID
ORACLE_UNQNAME=OMRDB ; export ORACLE_UNQNAME
ORACLE_BASE=/oem/app/oraemdb ; export ORACLE_BASE
ORACLE_HOME=$ORACLE_BASE/product/12.1.0.1/db ; export ORACLE_HOME
ORAINST=$ORACLE_HOME/oraInst.loc ; export ORAINST
TNS_ADMIN=$ORACLE_HOME/network/admin ; export TNS_ADMIN
PATH=$PATH:$ORACLE_HOME/bin ; export PATH
EDITOR=vi ; export EDITOR
TMPDIR=$ORACLE_BASE/tmp ; export TMPDIR
if [ ! -
then
mkdir -
fi
echo -
echo ORACLE_BASE=$ORACLE_BASE
echo ORACLE_HOME=$ORACLE_HOME
echo ORACLE_SID=$ORACLE_SID
echo ORACLE_UNQNAME=$ORACLE_UNQNAME
echo ORAINST=$ORAINST
echo TNS_ADMIN=$TNS_ADMIN
echo TMPDIR=$TMPDIR
echo
DOWNLOAD THE DATABASE SOFTWARE (OPTIONAL)
If you don’t have the installation disk (DVD), you may download the latest software from Oracle’s website that matches your platform which in my case is Solaris 11 for x64 processor. The software itself may come with several disk files in zip format. Files with an affixed name similar to disk1 and disk2 are the main database software. The rest are utilities that supports the database such as ASM grid, client, and gateways.
Once download is complete, you may FTP the files to your server and unzip them. You will then see a directory called database.
- List the files you had just uploaded.
s111oem:~/Downloads/12cR1$ ls *.zip
solaris.x64_12cR1_database_1of2.zip solaris.x64_12cR1_database_2of2.zip
s111oem:~/Downloads/12cR1$
- Unzip the files.
s111oem:~/Downloads/12cR1$ unzip solaris.x64_12cR1_database_1of2.zip
s111oem:~/Downloads/12cR1$ unzip solaris.x64_12cR1_database_2of2.zip
INSTALL THE ORACLE DATABASE SOFTWARE
1. Source-
s111oem:~/.env$ . ./oraenv_oemdb.sh
-
ORACLE_BASE=/oem/app/oraemdb
ORACLE_HOME=/oem/app/oraemdb/product/12.1.0.1/db
ORACLE_SID=OMRDB
ORACLE_UNQNAME=OMRDB
ORAINST=/oem/app/oraemdb/product/12.1.0.1/db/oraInst.loc
TNS_ADMIN=/oem/app/oraemdb/product/12.1.0.1/db/network/admin
TMPDIR=/oem/app/oraemdb/tmp
s111oem:~/.env$
2. Verify your environment settings
s111oem:~/.env$ env | grep ORA
ORACLE_UNQNAME=OMRDB
ORACLE_SID=OMRDB
ORACLE_BASE=/oem/app/oraemdb
ORAINST=/oem/app/oraemdb/product/12.1.0.1/db/oraInst.loc
ORACLE_HOME=/oem/app/oraemdb/product/12.1.0.1/db
s111oem:~/.env$
3. Go to the installer database directory.
s111oem:~/Downloads/12cR1$ cd database
s111oem:~/Downloads/12cR1/database$ ls -
total 52
drwxr-
drwxrwxr-
drwxr-
-
drwxrwxr-
drwxr-
-
s111oem:~/Downloads/12cR1/database$
4. Run the installer and you’ll be prompted with an X window for the step 1 of the process.
s111oem:~/Downloads/12cR1/database$ ./runInstaller
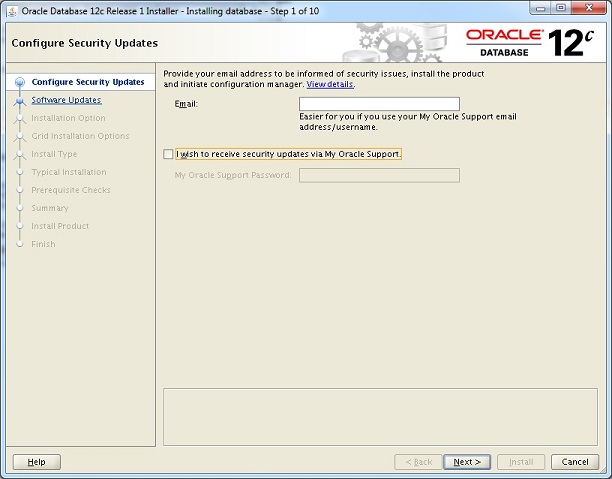
STEP 1. Provide your Oracle support credentials. If you don’t have one, you uncheck this option and go to the next step.
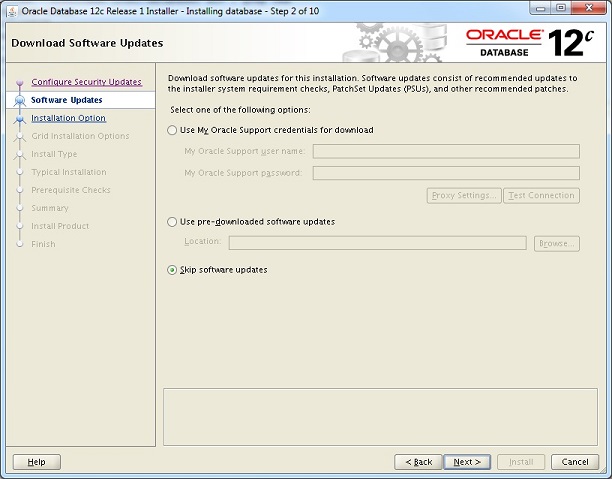
STEP 2. Skip the software updates if you don’t have Oracle support account or a pre-
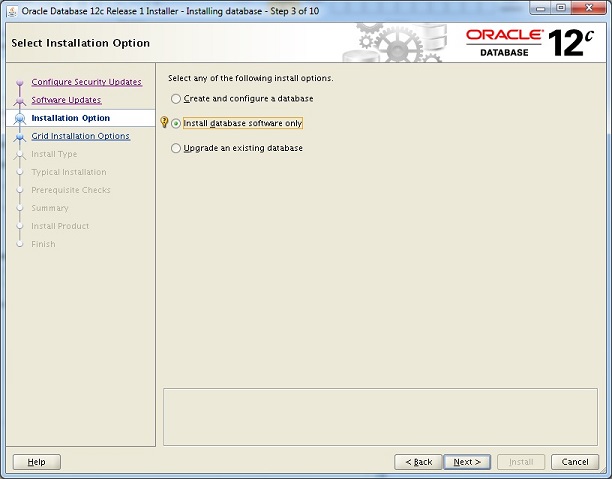
STEP 3. Select -