

©2015 -


Information Technology

HOW TO CREATE MacOS USB INSTALLER

This is a command line method of building a USB MacOS installer.
It has been observed that building USB installers based on the latest version download of MacOS installer app can only be recognized by your current running MacOS if its version is about 3 generations or closer.
Rule of thumb is always keep your OS version at least one version below the latest.
1. Download from App Store the MacOS you need (i.e. High Sierra).
When download finishes, the installer will launch automatically; just quit the Install MacOS prompt.
If the App Store no longer shows the availability of the OS, here's a quick link:
10.12.4 Sierra (App Store)
10.13.6 High Sierra (App Store)
10.14.6 Mojave (App Store) NOTE: Mojave is the last MacOS that supports 32-
10.15.7 Catalina (App Store)
10.11.6 El Capitan (DMG Installer)
10.13.6 High Sierra (DMG Installer Combo Update)
10.14.6 Mojave (DMG Installer Combo Update)
10.15.7 Catalina (DMG Installer Combo Update)
If for some reason the App Store no longer make available the Mac OS version you'd like to download, you can do it by command line using a terminal.
Syntax:
softwareupdate -
Here is a list of the final versions of each Mac OS:
High Sierra = 10.13 (patch 10.13.6) [Last Mac OS Support for any 2011 Mac computers]
Mojave = 10.14 (patch 10.14.6)
Catalina = 10.15 (patch 10.15.7) [Last Mac OS support for any 2012 Mac computers]
Big Sur = 11.6 (patch 11.6.1) [1st Gen transitional OS supporting both intel Mac and Apple Silicon Mac]
Monterey = 12.0 [newly released version as of this updated writing -
For example, downloading the final release of Big Sur would have 11.6 version.
Once the commmand is executed, it will initiate an install. You have nothing to worry when you see the progress bar as it actually does not install Mac OS itself but rather it is installing an image in the applications folder for which you can later on reference this to create a USB image.
You need to wait for the install progress to reach 100% and a response of -
Sample runtime output:
chad@MM18 ~ % softwareupdate -
Downloading and installing 11.6 installer
Install finished successfully
chad@MM18 ~ %
NOTE: Apple Store may seem to make the installer of a previous version from the current to be available for a “short” time. However, I observed that anything that is of 2 generations below the current version may no longer be around. And so it is important to always download an installer for every new Mac OS version even if you have no intention to upgrade just to have these installer images available for you. Otherwise, you will miss the boat and there will be no other way to download a previous version when you need it.
2. Insert USB drive (8gb minimum)
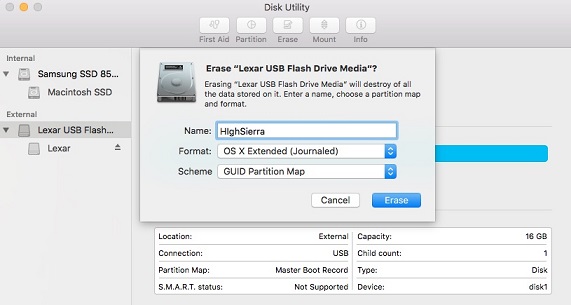
3. Format USB with HFS and name it accordingly (i.e. HighSierra) using a Disk Utility tool.
4. Locate the downloaded installer directory via Terminal utility.
chad$ ls -
drwxr-
drwxr-
chad$
5. Execute command below in the Terminal. Make sure that the parameter value /Volume/<your_USB_name> matches with what you label the USB in step 3.
chad$ df -
Filesystem Size Used Avail Capacity iused ifree %iused Mounted on
/dev/disk0s2 1.8Ti 1.1Ti 688Gi 64% 307683609 180485133 63% /
devfs 184Ki 184Ki 0Bi 100% 636 0 100% /dev
map -
map auto_home 0Bi 0Bi 0Bi 100% 0 0 100% /home
localhost:/c0QL2T50EOOSrbhX-
/dev/disk1s2 15Gi 36Mi 15Gi 1% 9266 3814082 0% /Volumes/HighSierra
chad$
chad$ sudo /Applications/Install\ macOS\ High\ Sierra.app/Contents/Resources/createinstallmedia -
Password:
Ready to start.
To continue we need to erase the volume at /Volumes/HighSierra.
If you wish to continue type (Y) then press return: Y
Erasing Disk: 0%... 10%... 20%... 30%...100%...
Copying installer files to disk...
Copy complete.
Making disk bootable...
Copying boot files...
Copy complete.
Done.
chad$
6. Optionally, you may check the name of the installer volume -
chad$ df -
Filesystem Size Used Avail Capacity iused ifree %iused Mounted on
/dev/disk0s2 1.8Ti 1.1Ti 688Gi 64% 307688569 180480173 63% /
devfs 184Ki 184Ki 0Bi 100% 638 0 100% /dev
map -
map auto_home 0Bi 0Bi 0Bi 100% 0 0 100% /home
localhost:/c0QL2T50EOOSrbhX-
/dev/disk1s2 15Gi 4.9Gi 9.7Gi 34% 1288024 2535324 34% /Volumes/Install macOS High Sierra
chad$