
©2015 -


X11 FORWARDING FOR SWITCHED USER
In most Unix and Linux environments, when X11 forwarding is set at the sshd, upon login to the terminal an .Xauthority file usually is created with its cookie details. When switching to another user, that x11 property is not carried over to the new user. To enable x11 for the new user, all you got to do is copy that .Xauthority file of the user that had initially login to the terminal onto the home directory of the new/switched user.
In Solaris 11, somehow that .Xauthority file is not created at the home directory. So, my previous solution would no longer work. Now I have to resort to the xauth tool as demonstrated below to determine my options.
chad@s111oem:~$ ls -
.Xauthority: No such file or directory
Now let's check if an environment variable was set to overwrite the default .Xauthority file path.
chad@s111oem:~$ env | grep XAUTH
XAUTHORITY=/tmp/ssh-
Yes, so the system has assigned a temporary file for me. Either I would copy this file onto the switched user $HOME directory or simply create a .Xauthority file with the cookies of the primary user.
I would do the creation of the file this time.
First, get the display preferences of the primary user.
chad@s111oem:~$ env | grep DISPLAY
DISPLAY=localhost:10.0
Then, get the xauthority cookie details of the primary user.
chad@s111oem:~$ xauth list
s111oem/unix:10 MIT-
oraem@s111oem:~$
Now switch to the new user and check its xauthority properties.
chad@s111oem:~$ su -
Password:
Oracle Corporation SunOS 5.11 11.1 September 2012
oraem@s111oem:~$ xauth list
xauth: file /export/home/oraem/.Xauthority does not exist
oraem@s111oem:~$
Let's add the xauthority properties of the primary user onto this new user by creating a .Xauthority file.
oraem@s111oem:~$ xauth -
oraem@s111oem:~$ xauth list
s111oem/unix:10 MIT-
oraem@s111oem:~$
Now set the DISPLAY preferences equal to what the primary user has.
oraem@s111oem:~$ export DISPLAY=localhost:10.0
Test your settings by running xclock or xterm and it should now work.
NOTE: A re-
An example TO REMOVE OLD COOKIES:
First, let’s check and compare the existing cookies.
chad@s111oem:~$ xauth list
s111oem/unix:10 MIT-
chad@s111oem:~$ su -
Password:
Oracle Corporation SunOS 5.11 11.1 September 2012
oraem@s111oem:~$ xauth list
s111oem/unix:10 MIT-
oraem@s111oem:~$
Now that we know that the switched user oraem had the old cookie value, let’s remove it.
oraem@s111oem:~$ xauth remove s111oem/unix:10
oraem@s111oem:~$ xauth list
oraem@s111oem:~$
So it is now empty, let’s add a new cookie with values of the primary user.
oraem@s111oem:~$ xauth add s111oem/unix:10 MIT-
oraem@s111oem:~$ xauth list
s111oem/unix:10 MIT-
oraem@s111oem:~$
Your x11 forwarding of the switched user should now work.
Information Technology

X11 Forwarding In Solaris 11
Table Of Contents
X Server For Microsoft Windows
Enable X11 Forwarding In PuTTY Terminal
Enable X11 Forwarding In SecureCRT Terminal
X11 Forwarding For Switched User
The X11, which is also known as X Window System or simply X, is a framework for the graphical user interface in Unix and Linux environment. Developed by Massachusetts Institute of Technology (MIT) back in 1984 and is currently being maintained by X.org foundation as free and open source software.
Unlike the popular Microsoft Windows environment which requires all graphical applications to run local to the host device, the X Window is designed to run over the network via a terminal in a client-
- An X server runs on a user’s computer where a terminal (an xterm or a character terminal with a local X server) is connected to a remote computer where an X11 application resides.
- When a user executes an X11 application from the terminal, the graphical representation is being processed and constructed locally at the user’s machine via the X server.
- The X server provides the graphical display and I/O services.
- Only keyboard, mouse and touch screen input are being passed on to the application at the remote host.
- The application that runs at the remote host is deemed as the client in this particular case.
The above characteristics of an X11 client-
X Server For Microsoft Windows
Since the Microsoft Windows GUI environment is different from a Unix X11 GUI, you need an X Server software to be able to display the graphical interface of Unix. You have to run the X Server first in the Windows prior to executing a Unix graphical application from your terminal configured with X11 forwarding.
There are several vendors that offers this type of software and I can only recommend two just based on my experience of using them. You may download from their website a trial version.
Xming X Server For Windows -
Exceed PC X Server -
Enable X11 Forwarding in PuTTY Terminal
PuTTY is a free SSH and Telnet client and is probably the most widely used Unix terminal console for Microsoft Windows.
The software is maintained by an open source organization and you may download its latest release from their website -
To enable X11 forwarding,
Step 1. Run the X server application.
Step 2. Launch PuTTY and enter your login credentials.
Step 3. Expand the SSH tree on your left pane and select X11.
Step 4. Click the check box of ‘Enable X11 Forwarding’
Step 5. Click ‘Open’ button to connect.
Step 6. Test your X Window by running xterm from the Unix prompt.

Enable X11 Forwarding in SecureCRT Terminal
SecureCRT provides secure terminal access for Unix, Linux, and VMS environments. One feature that I liked of this product is the cloning of your connected session onto multiple tabbed window. Thus, you avoid the clutter of the traditional multiple terminal window on your desktop. You may download a trial version or a licensed copy from vandyke.com
To enable X11 forwarding,
Step 1. Run the X server application.
Step 2. Launch the SecureCRT terminal
Step 3. Select your session profile from the list and click properties from the top bar icons.
If you haven’t done creating your session profile, you may proceed to create a new session from the icon in the top bar. Enter your host and login credentials and the session name. Once done, you will see the session name on the list.
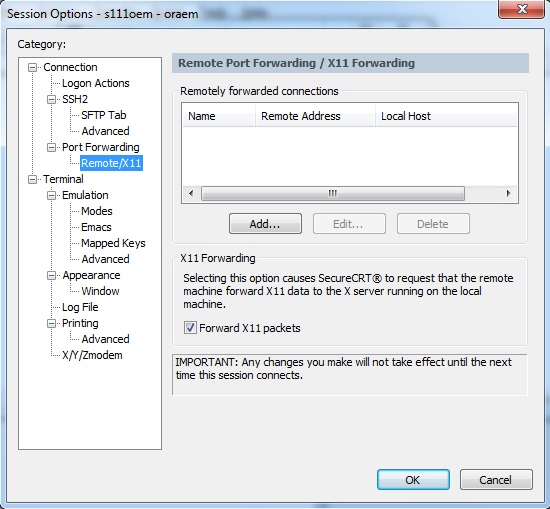
Step 4. From Session Option window, expand Connection → Port Forwarding → Remote X11
Click the checkbox of ‘Forward X11 packets’.
Step 5. Proceed with the login.
Step 6. Test your X Window by running xterm from the Unix prompt.