

©2015 -


Information Technology


How To Create An Oracle 12c Database -
STEP 10c. I chose the default character set of Western European. Choose the unicode if you anticipate asian characters to be stored in the database.
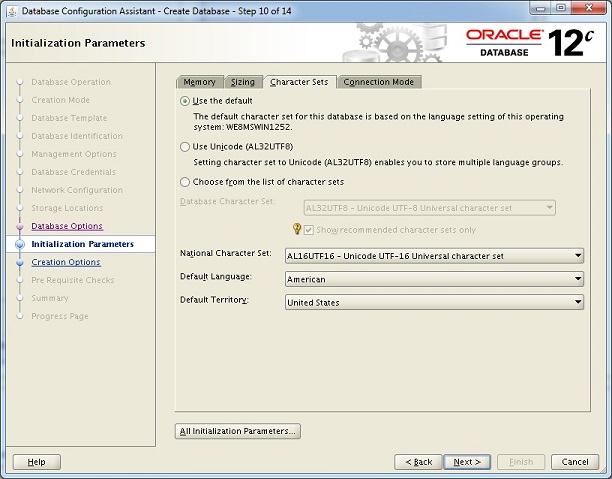
STEP 10d. Select the default Dedicated Server mode. This means that a dedicated process is assigned for each connected session. If your physical memory is small and you would want to accommodate more connections, you can have a set number of server processes be shared to execute the active transactions through Shared Server Mode.

STEP 11. Select Create Database. You may also consider customizing the storage location as you may have a different mount point to store the files.

STEP 12. Once you’re done with Step 11 file configuraitons, you click the [OK] button and a summary of your selections are displayed. When satisfied, click [finish] to proceed with the creation of database.


STEP 11b. Customize Storage option. This will allow you to define your path for your database files including the way you would want to name the files.
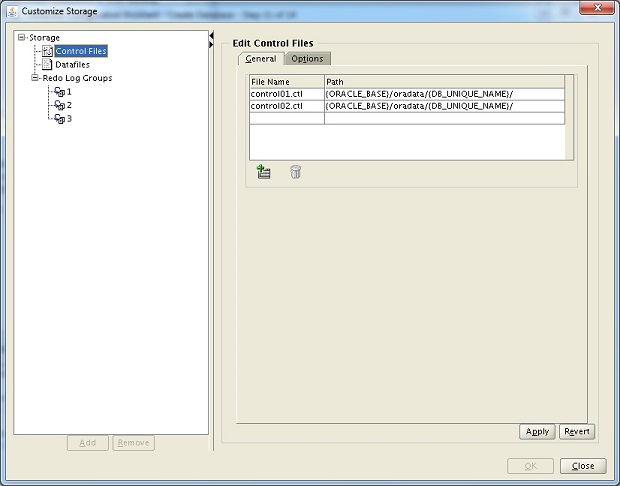
STEP 11c. Control Files. The General tab allows you to rename the control file and provide new paths for each file for purposes of redundancy. Typically, I would set the paths and name like this:
Control Files
{ORACLE_BASE}/oradata/{DB_UNIQUE_NAME}/ctl1/control01_{DB_UNIQUE_NAME}.ctl
{ORACLE_BASE}/oradata/{DB_UNIQUE_NAME}/ctl2/control02_{DB_UNIQUE_NAME}.ctl
The Oracle Control File is a binary file that has information related to the physical location of all database files, the redo log history, and backup records. It also has configuration information for the maximum supportable files and the maximum number of parallel database instances just in case one would decide to convert the regular single server database into multi-

STEP 11d. At the Options tab, you may want to set the maximum values in the control file according to the kind of transaction and growth of the database.
Typically, I would set it like this:
Control File Options:
Maximum Datafiles: 2000
Maximum Instances: 8
Maximum Log History: 1000
Maximum Redo Log Files: 36
Maximum Log Members: 3
Maximum Datafiles determines the total number of data files that this database can support.
Maximum Instances sets the number of parallel database instances it can support. A rule of thumb, you don’t want to go beyond 8 parallel instances as real world test indicates that there are performance degradation once you go beyond this number.
Maximum Log History tracks a history of redo log activity. For me, this is useful for tracking the rate of switching which can then be used to trend the peak times and their transaction rates.
Maximum Redo Log Files is the total number of redo files to support. You would normally calculate this according to the number of redo groups and its number of member redo files in a group. Thus, it would be in this formula:
(No. Of Redo Groups) X (No. Of Log Members)
Maximum Log Members sets the maximum number of redo files you can define within a redo group for the purposes of multiplexing and redundancy of redo log. The default is set to 3 and you don’t need to go beyond this as it would impact the performance of your system. Normally I would create just 2 log members per group as depicted in the succeeding sections of this demo.

STEP 11e. You can optionally rename the data files according to your naming standards and change their default paths. Normally, I would typically name them like this:
Datafiles
{ORACLE_BASE}/oradata/{DB_UNIQUE_NAME}/dbf/system01_{DB_UNIQUE_NAME}.dbf
{ORACLE_BASE}/oradata/{DB_UNIQUE_NAME}/dbf/sysaux01_{DB_UNIQUE_NAME}.dbf
{ORACLE_BASE}/oradata/{DB_UNIQUE_NAME}/dbf/undotbs01_{DB_UNIQUE_NAME}.dbf
{ORACLE_BASE}/oradata/{DB_UNIQUE_NAME}/dbf/users01_{DB_UNIQUE_NAME}.dbf
{ORACLE_BASE}/oradata/{DB_UNIQUE_NAME}/dbf/temp01_{DB_UNIQUE_NAME}.dbf

STEP 11f. You might need to modify the redo groups other than the defaults provided. In my case, I opted for multiplexing 2 redo files per group and added 1 more group to make it 4 groups.
Redo Log Groups
Group# 1
File Size: 512 M Bytes
{ORACLE_BASE}/oradata/{DB_UNIQUE_NAME}/redo1/redo1g1_{DB_UNIQUE_NAME}.log
{ORACLE_BASE}/oradata/{DB_UNIQUE_NAME}/redo2/redo2g1_{DB_UNIQUE_NAME}.log
Group# 2
File Size: 512 M Bytes
{ORACLE_BASE}/oradata/{DB_UNIQUE_NAME}/redo1/redo1g2_{DB_UNIQUE_NAME}.log
{ORACLE_BASE}/oradata/{DB_UNIQUE_NAME}/redo2/redo2g2_{DB_UNIQUE_NAME}.log
Group# 3
File Size: 512 M Bytes
{ORACLE_BASE}/oradata/{DB_UNIQUE_NAME}/redo1/redo1g3_{DB_UNIQUE_NAME}.log
{ORACLE_BASE}/oradata/{DB_UNIQUE_NAME}/redo2/redo2g3_{DB_UNIQUE_NAME}.log
Group# 4
File Size: 512 M Bytes
{ORACLE_BASE}/oradata/{DB_UNIQUE_NAME}/redo1/redo1g4_{DB_UNIQUE_NAME}.log
{ORACLE_BASE}/oradata/{DB_UNIQUE_NAME}/redo2/redo2g4_{DB_UNIQUE_NAME}.log