
©2015 -


Information Technology


Oracle 12c ASM Installation and Configuration
Table Of Contents
Build the Oracle Base and Oracle Home Directories
Create Environment Script For Grid User
Prepare The Raw Disk For Use With ASM
Grid Install (Software Only)
Configure High Availability Services
Create ASM Instance and Configure ASM Disk Groups
How To Check The Status Of The Disk Groups
How To Add Disk to A Disk Group
How To Drop Disk From A Disk Group
ASMCMD Command Instance Management
First, we need to create the OS groups and OS users. In my case, I had a separate Oracle grid user and Oracle database user.
My platform environment is Solaris 10 UNIX and I'll be using project resource management.
groupadd -
groupadd -
groupadd -
groupadd -
groupadd -
groupadd -
projadd -
-
-
projadd -
-
-
useradd -
-
useradd -
-
-
BUILD THE ORACLE BASE AND ORACLE HOME DIRECTORIES
# mkdir -
# mkdir -
# mkdir -
# chown -
# chmod -
# chown oradb:orainst /dsk0/app/oracle
CREATE ENVIRONMENT SCRIPT FOR GRID USER
gridenv_12c.sh
ORACLE_SID=+ASM
export ORACLE_SID
ORACLE_BASE=/dsk0/app/grid ; export ORACLE_BASE
ORACLE_HOME=/dsk0/app/12.1.0/grid ; export ORACLE_HOME
PATH=$PATH:$ORACLE_HOME/bin ; export PATH
TMPDIR=/tmp ; export TMPDIR
EDITOR=vi ; export EDITOR
#
# set proper project
#
# newtask -
echo -
echo ORACLE_BASE=$ORACLE_BASE
echo ORACLE_HOME=$ORACLE_HOME
echo ORACLE_SID=$ORACLE_SID
echo
PREPARE THE RAW DISK FOR USE WITH ASM
In most cases, ASM uses raw disks for its storage. With Linux environment, there is a limitation of the number of inode it supports and it is advisable to use ASMlib and build your grid disk as your storage for ASM. This ASMlib will not be discussed here since it is not applicable to our Solaris UNIX environment. As of this writing, ASMlib was only meant for Linux.
For purposes of this demonstration, I had prepared the raw disks for the ASM and listed as follows:
# ls -
crw-
crw-
crw-
crw-
crw-
crw-
#
Note the ownership of the raw disks which is set to the oracle grid user.
The asmreco* disks are for the recovery disk group (FRA) which we will name later on as RECO_DG.
The asmdata* disks are for the data disk group which we will name later on as DATA_DG.
For more information on how to create raw disks in Solaris UNIX, see my article here -
Unzip your grid installation files. If you haven't had the files yet, you may download the files from Oracle website.
# su -
atlantic:oragrid> unzip solaris.x64_12cR1_grid_1of2.zip
atlantic:oragrid> unzip solaris.x64_12cR1_grid_2of2.zip
The unzip creates a "grid" directory were all the install binaries are stored.
To begin your install, login as oragrid on a separate X Terminal and set your environment variable:
atlantic:oragrid> ls
gridenv_12c.sh*
atlantic:oragrid> . ./gridenv_12c.sh
-
ORACLE_BASE=/dsk0/app/grid
ORACLE_HOME=/dsk0/app/12.1.0/grid
ORACLE_SID=+ASM
atlantic:oragrid>
Then run the grid installer:
atlantic:oragrid> cd grid
atlantic:oragrid> ls -
total 60
drwxr-
drwxrwxr-
-
drwxr-
-
-
drwxrwxr-
drwxr-
-
atlantic:oragrid> ./runInstaller
You can opt for just the software install only for various reasons. As noted on the window prompt, this option is for advanced users only.
In our case, lets try this route, but doing this requires you to do additional steps.
1. Configure high availability services.
2. Update the node list.
3. Create the ASM listener.
4. Create the ASM instance.
5. For Oracle11g, Add the listener, asm instance and diskgroups to the Oracle Restart configuration.
NOTE: Starting with Oracle Database 12c, Oracle Restart is deprecated and is subject to desupport in future releases.
Additional Note: Oracle Inventory goes to /dsk0/app/oraInventory. It is recommended by Oracle that you use the same inventory path for both ASM and Database installations.
The last dialog on the installation gives you the following advice:
To configure Grid Infrastructure for a Stand-
/dsk0/app/12.1.0/grid/perl/bin/perl -
To configure Grid Infrastructure for a Cluster (RAC) execute the following command as oragrid user:
/dsk0/app/12.1.0/grid/crs/config/config.sh
This command launches the Grid Infrastructure Configuration Wizard.
The wizard also supports silent operation, and the parameters can be passed through the response file that is available in the installation media.
Once the installation is done, proceed to configuring the HAS daemon (High Availability Services).
CONFIGURE HIGH AVAILABILITY SERVICES
In my case, I'm building a stand-
# su -
password:
# /dsk0/app/12.1.0/grid/perl/bin/perl -
Using configuration parameter file: /dsk0/app/12.1.0/grid/crs/install/crsconfig_params
LOCAL ADD MODE
Creating OCR keys for user 'oragrid', privgrp 'orainst'..
Operation successful.
LOCAL ONLY MODE
Successfully accumulated necessary OCR keys.
Creating OCR keys for user 'root', privgrp 'root'..
Operation successful.
CRS-
2014/03/31 13:47:46 CLSRSC-
atlantic 2014/03/31 13:48:15 /dsk0/app/12.1.0/grid/cdata/atlantic/backup_20140331_134815.olr
2014/03/31 13:48:30 CLSRSC-
#
After the configuration, there are two files introduced at the init.d and entries are added in the inittab for grid startup
# ls -
-
-
#
# cat /etc/inittab
ap::sysinit:/sbin/autopush -
sp::sysinit:/sbin/soconfig -
smf::sysinit:/lib/svc/bin/svc.startd >/dev/msglog 2<>/dev/msglog </dev/console
p3:s1234:powerfail:/usr/sbin/shutdown -
h1:3:respawn:/etc/init.d/init.ohasd run >/dev/null 2>&1 </dev/null
#
atlantic:oragrid> crsctl check has
CRS-
atlantic:oragrid>
cd $ORACLE_HOME/oui/bin
./runInstaller -
Use netca to create your ASM listener. In my case, I created ASM_LISTENER and the entries are found in $ORACLE_HOME/network/admin/listener.ora
atlantic:oragrid> cat listener.ora
# listener.ora Network Configuration File: /dsk0/app/12.1.0/grid/network/admin/listener.ora
# Generated by Oracle configuration tools.
ASM_LISTENER =
(DESCRIPTION_LIST =
(DESCRIPTION =
(ADDRESS = (PROTOCOL = TCP)(HOST = atlantic)(PORT = 1599))
(ADDRESS = (PROTOCOL = IPC)(KEY = EXTPROC1599))
)
)
ENABLE_GLOBAL_DYNAMIC_ENDPOINT_ASM_LISTENER=ON # line added by Agent
VALID_NODE_CHECKING_REGISTRATION_ASM_LISTENER=SUBNET # line added by Agent
atlantic:oragrid>
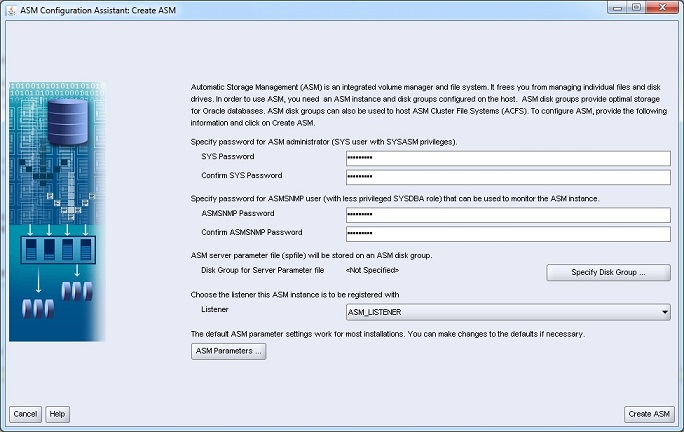
CREATE ASM INSTANCE AND CONFIGURE ASM DISK GROUPS
Use asmca to initially create the ASM instance and configure the initial disk group for the the spfile.
You always had the option to do this manually by creating the instance yourself with your own defined init.ora parameters.
But with the constant changes and updates of the Oracle product introduced by each patchset, you just don't want to miss some of the incorporated new features.
It is for that reason that it is encouraged to use the GUI utility asmca to ensure things are setup properly.
Run the asmca and supply the following info:
SYS password: oracle123 <<-
ASMSNMP password: oracle123