
©2015 -


Information Technology


HOW TO INSTALL AND CONFIGURE COUCHBASE SERVER
Couchbase is one of the popular NoSQL database widely used by many organizations as of this writing. Looking at the current documentation for those who wanted to setup their own test system to evaluate the capabilities of the product, it is quite often that it is not exactly straight forward to understand the instructions especially to those who are new to the Linux world. Although Couchbase can run on Windows Servers, majority has found that platform to have some performance issues and some level of difficulty in custom configuration because of the way the OS was designed. Thus, majority of the deployments were done on Linux.
The focus of this article is to demonstrate what I did to setup the Couchbase Server in Red Hat Linux and hopefully this would help give a quick jump start to those who wanted to learn the product.
So, let’s get started!
Table Of Contents
Setup Couchbase Server Infrastructure
Overview Of Red Hat Linux Servers
Host Date/Time Synchronization
Disable Transparent Huge Pages
Table Of User Configurable Parameters
Limitations Of Multi-
Linux Host Firewall Configuration
Network Firewall Configuration
Adding New Server Nodes To The Cluster
Setup Couchbase Instance Of The New Node
Building Second Cluster For Replication
Create A Bucket As A Recipient Of Replicated Data
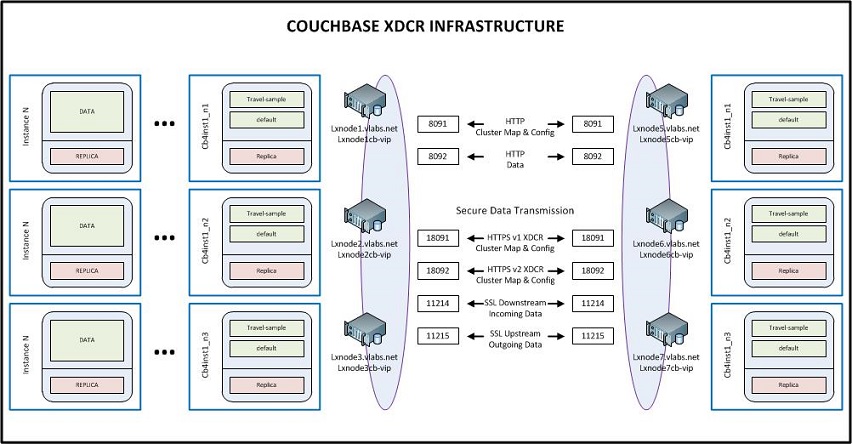
SETUP COUCHBASE SERVER INFRASTRUCTURE
Overview Of Red Hat Linux Servers
Using VMWare Fusion, I had created a total of 7 Red Hat Hosts with the following assigned fixed IPs:
# Red Hat Linux Hosts
172.16.33.91 lxnode1 lxnode1.vlabs.net
172.16.33.92 lxnode2 lxnode2.vlabs.net
172.16.33.93 lxnode3 lxnode3.vlabs.net
172.16.33.94 lxnode4 lxnode4.vlabs.net
172.16.33.95 lxnode5 lxnode5.vlabs.net
172.16.33.96 lxnode6 lxnode6.vlabs.net
172.16.33.97 lxnode7 lxnode7.vlabs.net
# Couchbase VIPs
172.16.33.84 lxnode1cb-
172.16.33.85 lxnode2cb-
172.16.33.86 lxnode3cb-
172.16.33.87 lxnode4cb-
172.16.33.88 lxnode5cb-
172.16.33.89 lxnode6cb-
172.16.33.90 lxnode7cb-
# Reserve Couchbase VIPs for the 2nd instance
172.16.33.81 lxnode1cb2-
172.16.33.82 lxnode2cb2-
172.16.33.83 lxnode3cb2-
I added the entries above to the /etc/hosts file on each of the host.
As for the Couchbase VIPs, I configured the IP of the corresponding VIP of each node via the Network Connections Manager (System Menu -
Example:
Configure lxnode1cb-
Configure lxnode2cb-
Configure lxnode3cb-
... and so on.
The goal of having a VIP is to explore the option of having a separate interface dedicated for only the Couchbase related network traffic and avoiding the use of the primary network interface of the host. Just note that in my illustration here, I had the VIP configured at the primary interface in the absence of the secondary network card. Nevertheless, we still were able to achieve the theory of using a different IP apart from the host IP when configuring the Couchbase server.
I am using RHEL 6.6 with Linux Kernel 2.6.32. Just for development purposes, each server host has 4 processor core, 2gb RAM and 20gb storage.
The plan is to configure a 3-
Later on we will configure replication between the 2 clusters. The unused lxnode4 will then serve as our client or application server in future explorations on the use of Couchbase.
Restart the host server to ensure that it picks up the new network time settings. Do this to all your hosts that had undergone the NTP changes.
You must size your swap space to at least the same size of your RAM if memory is <=16gb. For anything greater than 16gb RAM, set the swap file to at least 16gb, or use your best judgment.
To ensure that swapping is only used when memory has completely exhausted, set the following in your Linux.
1. On each node, determine the current swap usage configuration. The default is 60, which means at 60% memory utilization it would start swapping idle memory segments.
cat /proc/sys/vm/swappiness
2. Change the swap configuration and ensure that it persists through server restarts.
sudo sysctl vm.swappiness=0
Swappiness indicates how frequently a system uses the swap space based on RAM usage. The swappiness range is from 0 to 100 where, by default, most Linux platforms have swappiness set to 60.
3. Using sudo or root user privileges, edit the kernel parameters configuration file, /etc/sysctl.conf, so that the change is always in effect.
Append vm.swappiness = 0 to the file.
# Engage swapping only when memory is exhausted
vm.swappiness = 0
4. Reboot your system.
Disable Transparent Huge Pages (THP)
RHEL6 and other newer Linux distributions, running both on physical hardware and on virtual machines, are known to have transparent huge pages feature enabled. It is strongly recommended to disable the transparent huge pages feature when installing Couchbase Server.
For more details of what a THP is, refer to Red Hat's doc -
[chad@lxnode1 Desktop]$ ls /sys/kernel/mm/*transparent_hugepage/enabled
/sys/kernel/mm/redhat_transparent_hugepage/enabled
/sys/kernel/mm/transparent_hugepage/enabled
[chad@lxnode1 Desktop]$ ls /sys/kernel/mm/*transparent_hugepage/defrag
/sys/kernel/mm/redhat_transparent_hugepage/defrag
/sys/kernel/mm/transparent_hugepage/defrag
[chad@lxnode1 Desktop]$
Let's check the current setting:
[chad@lxnode1 Desktop]$ cat /sys/kernel/mm/redhat_transparent_hugepage/enabled
[always] madvise never
[chad@lxnode1 Desktop]$ cat /sys/kernel/mm/transparent_hugepage/enabled
[always] madvise never
[chad@lxnode1 Desktop]$ cat /sys/kernel/mm/redhat_transparent_hugepage/defrag
[always] madvise never
[chad@lxnode1 Desktop]$ cat /sys/kernel/mm/transparent_hugepage/defrag
[always] madvise never
[chad@lxnode1 Desktop]$
Add the following code to /etc/rc.local to permanently disable THD every time the host boots.
for i in /sys/kernel/mm/*transparent_hugepage/enabled; do
echo never > $i;
done
for i in /sys/kernel/mm/*transparent_hugepage/defrag; do
echo never > $i;
done
Here's a sample entry:
[root@lxnode1 ~]# cat /etc/rc.local
#!/bin/sh
#
# This script will be executed *after* all the other init scripts.
# You can put your own initialization stuff in here if you don't
# want to do the full Sys V style init stuff.
touch /var/lock/subsys/local
#
# Required for Couchbase:
for i in /sys/kernel/mm/*transparent_hugepage/enabled; do
echo never > $i;
done
for i in /sys/kernel/mm/*transparent_hugepage/defrag; do
echo never > $i;
done
[root@lxnode1 ~]#
Reboot the host for changes to take effect. Do the same procedure for the rest of the hosts.
Verify the changes for THP
[chad@lxnode1 Desktop]$ cat /sys/kernel/mm/redhat_transparent_hugepage/enabled
always madvise [never]
[chad@lxnode1 Desktop]$ cat /sys/kernel/mm/transparent_hugepage/enabled
always madvise [never]
[chad@lxnode1 Desktop]$ cat /sys/kernel/mm/redhat_transparent_hugepage/defrag
always madvise [never]
[chad@lxnode1 Desktop]$ cat /sys/kernel/mm/transparent_hugepage/defrag
always madvise [never]
[chad@lxnode1 Desktop]$
Normally, for production Couchbase installs, you would use root or sudo to install the rpm packages of Couchbase. However, on future configuration modifications, patching and upgrades, it would be cumbersome for the database administrator to do maintenance without the assistance of Systems Administrators or to itemize the required sudo privs. But Couchbase do allow installation using a non-
Create OS Group For Couchbase
groupadd -
Create OS User For Couchbase
useradd -
passwd couchbas
Do the OS Group and OS User creation in all hosts and make sure that all group id and user id are the same.
The maximum number of open files for the couchbase user must be to at least 40960.
This can be modified by by adding the following lines in /etc/security/limits.conf:
couchbase soft nofile <value>
couchbase hard nofile <value>
Where <value> is greater than 40960.
example:
couchbas soft nofile 51200
couchbas hard nofile 51200
Login as the user, and issue the following commands to verify the hard and the soft limits you had just implemented.
ulimit -
ulimit -
[root@lxnode1 ~]# su -
[couchbas@lxnode1 ~]$ ulimit -
51200
[couchbas@lxnode1 ~]$ ulimit -
51200
[couchbas@lxnode1 ~]$
Do the above modifications for user limits in all hosts.
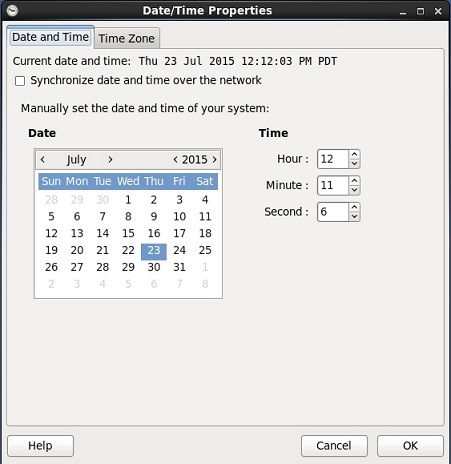
Host Date/Time Synchronization
Before we proceed with the Couchbase installation, it is essential that we ensure all clocks are synchronized on all hosts.
For each host, set the correct time zone and use the network time protocol for accurate clock synchronization.
Go to the Top Bar Menu and select System -
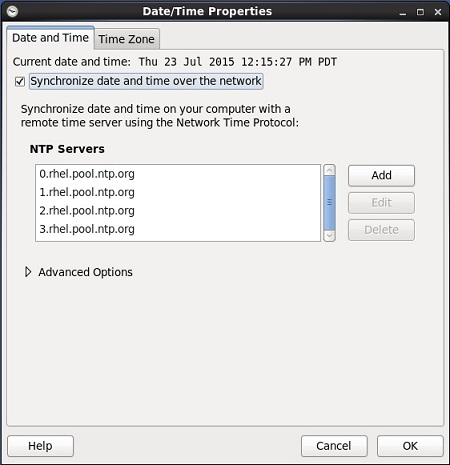
Then, at the Date and Time tab, check the Synchronize Date and Time Over The Network.
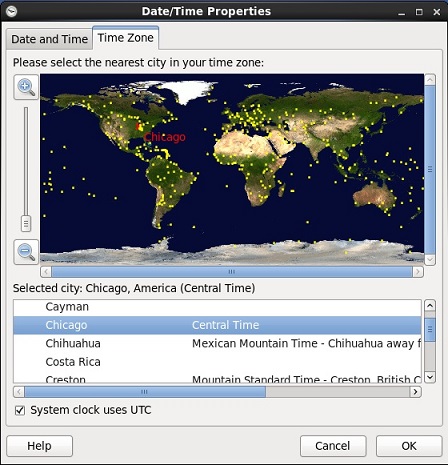
After that, select the time zone tab and pick the correct time zone for the host.
To finalize the changes, click OK.