
©2015 -


Information Technology


Oracle 12c Enterprise Manager Cloud Control Installation -
Oracle Enterprise Manager High Availability Configuration
NOTE: This article is an extension of my previous article on Oracle Enterprise Manager (OEM) Stand Alone Installation. I advice that you read that section first if you are not familiar with the basic installation procedures.
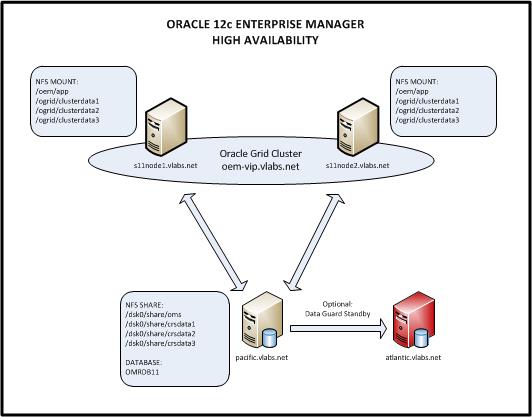
High Availability in Oracle Enterprise Manager (OEM) as of this writing is mostly based on the failover capability of the OMS instance onto another node. You may further extend this failover capability also onto its repository database (OMR) by either configuring it with Oracle Data Guard Physical Standby or Oracle RAC. But for this exercise, we'll only be focused on the OMS failover capability just to examine the idea of how its being done. If you wanted to explore the Data Guard database setup, check my article -
In today's powerful computers in the x86-
I. INFRASTRUCTURE AND OPERATING ENVIRONMENT OVERVIEW
Host: s11node1, s11node1.vlabs.net
OS: Solaris 11.2 x86-
RAM: 6 gb
Disk: 35 gb
Additional Net Interface:
eth1 (for the interconnect)
eth2 (for the OEM vip)
Description: This host is the primary node of the OEM
Host: s11node2, s11node2.vlabs.net
OS: Solaris 11.2 x86-
RAM: 6 gb
Disk: 35 gb
Additional Net Interface:
eth1 (for the interconnect)
eth2 (for the OEM vip)
Description: This host is the failover node of the OEM
Host: pacific.vlabs.net
OS: Solaris 10 x86-
Database: OMRDB
Description: This host is for the OMR database repository. This is also the NFS server for use with the Oracle Grid and as a shared repository of the OMS installation.
Shared File System:
/disk0/nfs/ocr (128mb)
/disk0/nfs/oms (min 24gb)
To describe the above architecture, there are two nodes (s11node1, s11node2) for the OMS but only one will be active at a time.
An OEM vip will be the main IP/host for the OEM and the failover of this IP will be controlled by the Oracle Grid Clusterware.
The NFS filesystems are mounted on both nodes for use with the Oracle Clusterware OCR and the installation of the OMS.
The OMR database represented by the instance OMRDB will be our database repository for the 12c OEM. The database setup will not be covered in this article and it is assumed that is up and running already. If you wanted to understand the creation of such database read a section of my article starting at Oracle EM Cloud Control Installation page 1 -
II. OPERATING ENVIRONMENT SETUP OF PRIMARY NODE AND FAILOVER NODE
BUILD A SOLARIS 11 VM FOR THE PRIMARY AND FAILOVER NODE
Unfortunately, this is totally a different topic if you wanted to dig deeper onto the building of virtualized instances. I will discuss this in my future articles when I have the time. But to those who are familiar with VMWare, I have used the ISO image of Solaris 11 R2 x86-
In my case, the net0 interface will have the following IPs:
s11node1 net0 172.16.33.120
s11node2 net0 172.16.33.121
Then my /etc/hosts file will have the initial entries of:
172.16.33.120 s11node1 s11node1.vlabs.net
172.16.33.121 s11node2 s11node2.vlabs.net
plus, I've added the pre-
172.16.33.126 pacific pacific.vlabs.net
Thus, my /etc/hosts for both nodes s11node1 and s11node2 would look like:
root@s11node1:/etc# cat /etc/hosts
#
# Copyright 2009 Sun Microsystems, Inc. All rights reserved.
# Use is subject to license terms.
#
# Internet host table
#
::1 s11node1 localhost
127.0.0.1 localhost loghost
172.16.33.120 s11node1 s11node1.vlabs.net
172.16.33.121 s11node2 s11node2.vlabs.net
172.16.33.126 pacific pacific.vlabs.net
root@s11node1:/etc#
REQUIRED PACKAGES
Ensure that you had the following required packages installed in the Solaris 11 of your cluster nodes:
SUNWbtool
* SUNWhea
SUNWlibm
SUNWlibms
SUNWsprot
SUNWtoo
* SUNWxwplt (This is for setting xwindow)
SUNWfont-
SUNWlibC
SUNWcsl
* = Denotes that the packages are missing in Solaris 11 default installation. You must install these packages.
To verify above packages:
pkginfo <package_name>
To install missing packages:
pkg install <package name>
Note: The package install will download the file from Oracle's website. Requires internet connection.
Example:
root@s11node1:~# pkginfo SUNWhea
ERROR: information for "SUNWhea" was not found
root@s11node1:~# pkg install SUNWhea
Packages to install: 1
Create boot environment: No
Create backup boot environment: No
DOWNLOAD PKGS FILES XFER (MB) SPEED
Completed 1/1 1584/1584 3.2/3.2 354k/s
PHASE ITEMS
Installing new actions 1702/1702
Updating package state database Done
Updating package cache 0/0
Updating image state Done
Creating fast lookup database Done
Updating package cache 1/1
root@s11node1:~#
root@s11node1:~# pkginfo SUNWhea
system SUNWhea SunOS Header Files
root@s11node1:~#
root@s11node1:~# pkginfo SUNWxwplt
ERROR: information for "SUNWxwplt" was not found
root@s11node1:~# pkg install SUNWxwplt
pkg install: 'SUNWxwplt' matches multiple packages
pkg://solaris/compatibility/packages/SUNWxwplt
pkg://solaris/SUNWxwplt
Please provide one of the package FMRIs listed above to the install command.
root@s11node1:~# pkg install //solaris/SUNWxwplt
Packages to install: 6
Create boot environment: No
Create backup boot environment: No
DOWNLOAD PKGS FILES XFER (MB) SPEED
Completed 6/6 51/51 0.7/0.7 143k/s
PHASE ITEMS
Installing new actions 229/229
Updating package state database Done
Updating package cache 0/0
Updating image state Done
Creating fast lookup database Done
Updating package cache 1/1
root@s11node1:~#
root@s11node1:~# pkginfo SUNWxwplt
system SUNWxwplt X Window System platform software
root@s11node1:~#
CREATE A VIP FOR USE WITH OEM AT THE PRIMARY SERVER
In my case, I configured an available IP 172.16.33.99 at my public interface and assigned a hostname oem-
If you don't know how to do this, read my instructions on how to configure a vip onto an existing network interface as discussed in my article -
Let's verify the VIP setup:
oraem@s11node1:~$ ifconfig -
lo0: flags=2001000849<UP,LOOPBACK,RUNNING,MULTICAST,IPv4,VIRTUAL> mtu 8232 index 1
inet 127.0.0.1 netmask ff000000
net0: flags=100001004843<UP,BROADCAST,RUNNING,MULTICAST,DHCP,IPv4,PHYSRUNNING> mtu 1500 index 2
inet 172.16.33.120 netmask ffffff00 broadcast 172.16.33.255
net0:1: flags=100001000843<UP,BROADCAST,RUNNING,MULTICAST,IPv4,PHYSRUNNING> mtu 1500 index 2
inet 172.16.33.99 netmask ffffff00 broadcast 172.16.33.255
net1: flags=100001004843<UP,BROADCAST,RUNNING,MULTICAST,DHCP,IPv4,PHYSRUNNING> mtu 1500 index 3
inet 192.168.65.111 netmask ffffff00 broadcast 192.168.65.255
lo0: flags=2002000849<UP,LOOPBACK,RUNNING,MULTICAST,IPv6,VIRTUAL> mtu 8252 index 1
inet6 ::1/128
net0: flags=120002004841<UP,RUNNING,MULTICAST,DHCP,IPv6,PHYSRUNNING> mtu 1500 index 2
inet6 fe80::20c:29ff:fe1b:7a7b/10
net1: flags=120002004841<UP,RUNNING,MULTICAST,DHCP,IPv6,PHYSRUNNING> mtu 1500 index 3
inet6 fe80::250:56ff:fe21:4912/10
oraem@s11node1:~$ ipadm show-
ADDROBJ TYPE STATE ADDR
lo0/v4 static ok 127.0.0.1/8
net0/v4 dhcp ok 172.16.33.120/24
net0/oemvip static ok 172.16.33.99/24
net1/v4 dhcp ok 192.168.65.111/24
lo0/v6 static ok ::1/128
net0/v6 addrconf ok fe80::20c:29ff:fe1b:7a7b/10
net1/v6 addrconf ok fe80::250:56ff:fe21:4912/10
oraem@s11node1:~$
The /etc/hosts entries in both nodes s11node1 and s11node2 has the following entries:
root@s11node1:~# cat /etc/hosts
#
# Copyright 2009 Sun Microsystems, Inc. All rights reserved.
# Use is subject to license terms.
#
# Internet host table
#
::1 s11node1 localhost
127.0.0.1 localhost loghost
172.16.33.120 s11node1 s11node1.vlabs.net
172.16.33.121 s11node2 s11node2.vlabs.net
172.16.33.126 pacific pacific.vlabs.net
192.168.65.111 s11grid1 s11grid1.private.net
192.168.65.112 s11grid2 s11grid2.private.net
172.16.33.99 oem-
root@s11node1:~#
CREATE USER AND GROUPS
Ensure that you have consistent UID/GID between NFS server and the OEM nodes.
For Solaris only, create the project resource for the users.
projadd -
-
-
-
projadd -
-
-
-
Create the OS groups (s11node1, s11node2, pacific)
groupadd -
groupadd -
groupadd -
groupadd -
groupadd -
groupadd -
Create the OS Users for Solaris:
useradd -
-
#useradd -
# -
useradd -
-
-
Set Environment script (.profile) for user oraem to add:
ORACLE_HOSTNAME=<your virtual host (vip)>
example:
ORACLE_HOSTNAME=oem-
CONFIGURE NFS SHARED FILE SYSTEM FOR OMS
The 12c EM Cloud Control software has to be made available in both nodes s11node1 and s11node2 so that at any failover event, the software ican be started. We will use NFS as our shared file system where installed software will reside. The Shared File System for both nodes will be mounted as /oem/app. At this point we’ll proceed on configuring the NFS server (pacific.vlabs.net) and client nodes (s11node1, s11node2) to create the mount point /oem/app. Detailed steps and examples are discussed in my article -
Once the NFS configuration is done, ensure that the ownership of the /oem/app mount point belongs to the Oracle OEM user oraem.
# chown oraem:orainst /oem/app
III. INSTALL ORACLE 12c CLOUD CONTROL SOFTWARE (also known as OEM)
The installation of OEM has already been covered in the previous sections of this article -
The only difference was the hostname should be the vip hostname instead of the node hostname. To ensure that the correct hostname will be assigned during the install set the following environment variable at the grid user oraem.
ORACLE_HOSTNAME=oem-
Also, ensure that the OMR database had the correct init parameter requirements as discussed here -
My environment parameter script for use with oraem user:
>>>File: oraenv_oem.sh
MIDDLEWARE_HOME=/oem/app/oraem/middleware ; export MIDDLEWARE_HOME
AGENT_BASE=/oem/app/oraem/agent12c ; export AGENT_BASE
INSTANCE_BASE=/oem/app/oraem/gc_inst ; export INSTANCE_BASE
ORACLE_HOSTNAME=oem-
ORACLE_HOME=$MIDDLEWARE_HOME/oms ; export ORACLE_HOME
PATH=$PATH:$ORACLE_HOME/bin:$ORACLE_HOME/OPatch:. ; export PATH
EDITOR=vi ; export EDITOR
TMPDIR=/oem/app/oraem/tmp ; export TMPDIR
TEMP=/oem/app/oraem/tmp ; export TEMP
TMP=/oem/app/oraem/tmp ; export TMP
if [ ! -
then
mkdir -
fi
echo -
echo MIDDLEWARE_HOME=$MIDDLEWARE_HOME
echo AGENT_BASE=$AGENT_BASE
echo INSTANCE_BASE=$INSTANCE_BASE
echo ORACLE_HOME=$ORACLE_HOME
echo TMPDIR=$TMPDIR
Pre-
mkdir -
mkdir -
mkdir -
mkdir -
Startup the OMRDB11 database first,
pacific:oradb> . ./oraenv_multihome_v2 db 11.2 OMRDB11
-
ORACLE_SID=OMRDB11
ORACLE_BASE=/dsk0/orabin/11gR2
ORACLE_HOME=/dsk0/orabin/11gR2/product/11.2.0.4/db
ORAINST=/dsk0/orabin/11gR2/product/11.2.0.4/db/oraInst.loc
TNS_ADMIN=/dsk0/orabin/11gR2/product/11.2.0.4/db/network/admin
NLS_LANG=AMERICAN_AMERICA.UTF8
pacific:oradb> ls
afiedt.buf oraenv_ORA10DB1_gg_db.sh*
oraenv_multihome_v2*
pacific:oradb> lsnrctl start OMRDB11
LSNRCTL for Solaris: Version 11.2.0.4.0 -
Copyright (c) 1991, 2013, Oracle. All rights reserved.
Starting /dsk0/orabin/11gR2/product/11.2.0.4/db/bin/tnslsnr: please wait...
TNSLSNR for Solaris: Version 11.2.0.4.0 -
System parameter file is /dsk0/orabin/11gR2/product/11.2.0.4/db/network/admin/listener.ora
Log messages written to /dsk0/orabin/11gR2/diag/tnslsnr/pacific/omrdb11/alert/log.xml
Listening on: (DESCRIPTION=(ADDRESS=(PROTOCOL=tcp)(HOST=pacific)(PORT=1537)))
Connecting to (DESCRIPTION=(ADDRESS=(PROTOCOL=TCP)(HOST=pacific)(PORT=1537)))
STATUS of the LISTENER
-
Alias OMRDB11
Version TNSLSNR for Solaris: Version 11.2.0.4.0 -
Start Date 05-
Uptime 0 days 0 hr. 0 min. 0 sec
Trace Level off
Security ON: Local OS Authentication
SNMP OFF
Listener Parameter File /dsk0/orabin/11gR2/product/11.2.0.4/db/network/admin/listener.ora
Listener Log File /dsk0/orabin/11gR2/diag/tnslsnr/pacific/omrdb11/alert/log.xml
Listening Endpoints Summary...
(DESCRIPTION=(ADDRESS=(PROTOCOL=tcp)(HOST=pacific)(PORT=1537)))
Services Summary...
Service "PLSExtProc" has 1 instance(s).
Instance "PLSExtProc", status UNKNOWN, has 1 handler(s) for this service...
The command completed successfully
pacific:oradb> sqlplus /nolog
SQL*Plus: Release 11.2.0.4.0 Production on Thu Feb 5 09:39:54 2015
Copyright (c) 1982, 2013, Oracle. All rights reserved.
SQL> connect / as sysdba
Connected to an idle instance.
SQL> startup
ORACLE instance started.
Total System Global Area 2137886720 bytes
Fixed Size 2252576 bytes
Variable Size 805306592 bytes
Database Buffers 1325400064 bytes
Redo Buffers 4927488 bytes
Database mounted.
Database opened.
SQL> exit
Disconnected from Oracle Database 11g Enterprise Edition Release 11.2.0.4.0 -
With the Partitioning, OLAP, Data Mining and Real Application Testing options
pacific:oradb>
Back at your cluster nodes, if you are on Solaris 11.2 initial public release, ensure that an assembler compiler exist.
This was somehow left out during the development package install. To check do:
oraem@s11node1:~$ ls /usr/ccs/bin/as
/usr/ccs/bin/as: No such file or directory
oraem@s11node1:~$
In this case, it is missing. To avoid encountering the make file errors during the install, install the assembler package per instructions below:
root@s11node1:~# pkg search assembler
INDEX ACTION VALUE PACKAGE
pkg.fmri set solaris/developer/assembler pkg:/developer/assembler@0.5.11-
pkg.summary set Converts assembler source code to object code. pkg:/developer/assembler@0.5.11-
root@s11node1:~# pkg install assembler
Packages to install: 1
Create boot environment: No
Create backup boot environment: No
DOWNLOAD PKGS FILES XFER (MB) SPEED
Completed 1/1 6/6 0.2/0.2 127k/s
PHASE ITEMS
Installing new actions 14/14
Updating package state database Done
Updating package cache 0/0
Updating image state Done
Creating fast lookup database Done
Updating package cache 1/1
root@s11node1:~#
root@s11node1:~# ls -
-
root@s11node1:~#
Then run the 12c OEM installer using the following parameters.
runInstaller -
During the install, set your oracle inventory path to /oem/app/oraInventory and the rest of the options set to default.
Take note of the password you had supplied for the following users:
Middleware users:
weblogic
nodemanager
The agent registration password: oracle123
Database user:
sysman
At the last part of the installation, you’ll be prompted to run the root script.
root@s11node1:/oem/app/oraem/middleware/oms#./allroot.sh
Once the installation has finished, a window will display the following message:
This information is also available at:
/oem/app/oraem/middleware/oms/install/setupinfo.txt
See below for information pertaining to your Enterprise Manager installation:
Use the following URL to access:
1. Enterprise Manager Cloud Control URL: https://oem-
2. Admin Server URL: https://oem-
The following details need to be provided during the additional OMS install:
1. Admin Server Hostname: oem-
2. Admin Server Port: 7101
You can find the details on ports used by this deployment at : /oem/app/oraem/middleware/oms/install/portlist.ini
NOTE:
An encryption key has been generated to encrypt sensitive data in the Management Repository. If this key is lost, all encrypted data in the Repository becomes unusable.
A backup of the OMS configuration is available in /oem/app/oraem/gc_inst/em/EMGC_OMS1/sysman/backup on host oem-
NOTE: This backup is valid only for the initial OMS configuration. For example, it will not reflect plug-
/oem/app/oraem/middleware/oms/bin/emctl exportconfig oms -
At this point, the installation of the 12c Cloud Control Software has completed.
We can now proceed to next steps to enable High Availability so that the OEM instance can failover to the next node.
So far, what we have accomplished is the installation of OEM on a shared file system via the NFS mount and the use of VIP as the OEM host. The VIP (oem-
The setup of Oracle Grid Cluster has been covered by my article -
APPLICATION FAILOVER PREP TASKS FOR OEM
Setup Oracle Inventory Location
Since we installed OEM only in the first node s11node1, the Oracle inventory Location file oraInst.loc only exists in that node. This file is important since it tells where the installation of various Oracle software are located and is useful during patching and upgrade of OEM. This file has to exist also in the second node s11node2. But at the moment since we installed the Oracle Grid, the inventory file is pointing at the local installed directories of the grid software. We need to backup the existing inventory location file -
As root (do this on both nodes -
# cd /var/opt/oracle
# cp oraInst.loc oraInst.loc.grid
Next, locate the oraInst.loc of the OEM.
It usually reside at two directory levels up of the MIDDLEWARE_HOME. In my case, the MIDDLEWARE_HOME is /oem/app/oraem/middleware and that means the inventory file will be located at /oem/app/oraInventory/oraInst.loc
# ls -
Then, create a symbolic link in /var/opt/oracle pointing to that file.
# cd /var/opt/oracle
# ln -
Verify that the file is pointing to the correct location (/oem/app/oraInventory/oraInst.loc)
# ls -
Setup OEM User Environment Script
Create/modify a user environment script to include ORACLE_HOSTNAME set to the OEM VIP. Do this on both nodes.
>>>>oraenv_oem.sh
MIDDLEWARE_HOME=/oem/app/oraem/middleware ; export MIDDLEWARE_HOME
AGENT_BASE=/oem/app/oraem/agent12c ; export AGENT_BASE
INSTANCE_BASE=/oem/app/oraem/gc_inst ; export INSTANCE_BASE
ORACLE_HOSTNAME=oem-
ORACLE_HOME=$MIDDLEWARE_HOME/oms ; export ORACLE_HOME
PATH=$PATH:$ORACLE_HOME/bin:$ORACLE_HOME/OPatch:. ; export PATH
EDITOR=vi ; export EDITOR
TMPDIR=/oem/app/oraem/tmp ; export TMPDIR
TEMP=/oem/app/oraem/tmp ; export TEMP
TMP=/oem/app/oraem/tmp ; export TMP
if [ ! -
then
mkdir -
fi
echo -
echo MIDDLEWARE_HOME=$MIDDLEWARE_HOME
echo AGENT_BASE=$AGENT_BASE
echo INSTANCE_BASE=$INSTANCE_BASE
echo ORACLE_HOSTNAME=$ORACLE_HOSTNAME
echo ORACLE_HOME=$ORACLE_HOME
echo TMPDIR=$TMPDIR
Test OEM Startup In The Failover Node
The objective is to test whether the OEM can successfully startup at the failover node.
1. If OEM is active, shutdown the running OMS in s11node1.
As OEM user, execute -
emctl stop oms all
2. Execute failover of OEM VIP from the primary node (s11node1) to the second node (s11node2).
As grid user, execute -
crsctl relocate resource omsvip -
Example:
Check if the resource omsvip is online in the primary node s11node1.
oragrid@s11node1:~/.env$ crs_stat -
Name Type Target State Host
-
omsvip app....t1.type ONLINE ONLINE s11node1
ora....ER.lsnr ora....er.type ONLINE ONLINE s11node1
ora....N1.lsnr ora....er.type ONLINE ONLINE s11node1
ora.asm ora.asm.type OFFLINE OFFLINE
ora.cvu ora.cvu.type ONLINE ONLINE s11node1
ora.gsd ora.gsd.type OFFLINE OFFLINE
ora....network ora....rk.type ONLINE ONLINE s11node1
ora.oc4j ora.oc4j.type ONLINE ONLINE s11node1
ora.ons ora.ons.type ONLINE ONLINE s11node1
ora....ry.acfs ora....fs.type OFFLINE OFFLINE
ora....SM1.asm application OFFLINE OFFLINE
ora....E1.lsnr application ONLINE ONLINE s11node1
ora....de1.gsd application OFFLINE OFFLINE
ora....de1.ons application ONLINE ONLINE s11node1
ora....de1.vip ora....t1.type ONLINE ONLINE s11node1
ora....SM2.asm application OFFLINE OFFLINE
ora....E2.lsnr application ONLINE ONLINE s11node2
ora....de2.gsd application OFFLINE OFFLINE
ora....de2.ons application ONLINE ONLINE s11node2
ora....de2.vip ora....t1.type ONLINE ONLINE s11node2
ora.scan1.vip ora....ip.type ONLINE ONLINE s11node1
oragrid@s11node1:~/.env$
Failover the resource omsvip to the second node s11node2.
oragrid@s11node1:~/.env$ crsctl relocate resource omsvip -
CRS-
CRS-
CRS-
CRS-
oragrid@s11node1:~/.env$
oragrid@s11node1:~/.env$ crs_stat -
Name Type Target State Host
-
omsvip app....t1.type ONLINE ONLINE s11node2
ora....ER.lsnr ora....er.type ONLINE ONLINE s11node1
ora....N1.lsnr ora....er.type ONLINE ONLINE s11node1
ora.asm ora.asm.type OFFLINE OFFLINE
ora.cvu ora.cvu.type ONLINE ONLINE s11node1
ora.gsd ora.gsd.type OFFLINE OFFLINE
ora....network ora....rk.type ONLINE ONLINE s11node1
ora.oc4j ora.oc4j.type ONLINE ONLINE s11node1
ora.ons ora.ons.type ONLINE ONLINE s11node1
ora....ry.acfs ora....fs.type OFFLINE OFFLINE
ora....SM1.asm application OFFLINE OFFLINE
ora....E1.lsnr application ONLINE ONLINE s11node1
ora....de1.gsd application OFFLINE OFFLINE
ora....de1.ons application ONLINE ONLINE s11node1
ora....de1.vip ora....t1.type ONLINE ONLINE s11node1
ora....SM2.asm application OFFLINE OFFLINE
ora....E2.lsnr application ONLINE ONLINE s11node2
ora....de2.gsd application OFFLINE OFFLINE
ora....de2.ons application ONLINE ONLINE s11node2
ora....de2.vip ora....t1.type ONLINE ONLINE s11node2
ora.scan1.vip ora....ip.type ONLINE ONLINE s11node1
oragrid@s11node1:~/.env$
Verify if the IP is configured on the network interface in s11node2.
oraem@s11node2:~/.env$ cat /etc/hosts | grep oem-
172.16.33.99 oem-
oraem@s11node2:~/.env$ ifconfig -
inet 172.16.33.99 netmask ffffff00 broadcast 172.16.33.255
oraem@s11node2:~/.env$
3. Manually startup the OEM at the second node (s11node2).
As OEM user, execute -
emctl start oms
Example:
Verify that the NFS mount of OEM software exist in s11node2
oraem@s11node2:~/.env$ df -
Filesystem Size Used Available Capacity Mounted on
rpool/ROOT/solaris 34G 6.9G 16G 31% /
/devices 0K 0K 0K 0% /devices
/dev 0K 0K 0K 0% /dev
ctfs 0K 0K 0K 0% /system/contract
proc 0K 0K 0K 0% /proc
mnttab 0K 0K 0K 0% /etc/mnttab
swap 3.6G 1.6M 3.6G 1% /system/volatile
objfs 0K 0K 0K 0% /system/object
sharefs 0K 0K 0K 0% /etc/dfs/sharetab
/usr/lib/libc/libc_hwcap1.so.1
23G 6.9G 16G 31% /lib/libc.so.1
fd 0K 0K 0K 0% /dev/fd
rpool/ROOT/solaris/var
34G 249M 16G 2% /var
swap 3.6G 104K 3.6G 1% /tmp
rpool/VARSHARE 34G 449K 16G 1% /var/share
rpool/export 34G 32K 16G 1% /export
rpool/export/home 34G 35K 16G 1% /export/home
rpool/export/home/chad
34G 867K 16G 1% /export/home/chad
rpool/export/home/oraem
34G 320K 16G 1% /export/home/oraem
rpool/export/home/oragrid
34G 9.0M 16G 1% /export/home/oragrid
rpool 34G 5.0M 16G 1% /rpool
rpool/VARSHARE/zones 34G 31K 16G 1% /system/zones
rpool/VARSHARE/pkg 34G 32K 16G 1% /var/share/pkg
rpool/VARSHARE/pkg/repositories
34G 31K 16G 1% /var/share/pkg/repositories
pacific:/dsk0/share/crsdata1
63G 47G 16G 75% /ogrid/crsdata1
pacific:/dsk0/share/crsdata2
63G 47G 16G 75% /ogrid/crsdata2
/hgfs 16G 4.0M 16G 1% /hgfs
/tmp/VMwareDnD 0K 0K 0K 0% /system/volatile/vmblock
pacific:/dsk0/share/oms
63G 47G 16G 75% /oem/app
oraem@s11node2:~/.env$
Startup the OMS in the failover node s11node2
oraem@s11node2:~/.env$ . ./oraenv_oem.sh
-
MIDDLEWARE_HOME=/oem/app/oraem/middleware
AGENT_BASE=/oem/app/oraem/agent12c
INSTANCE_BASE=/oem/app/oraem/gc_inst
ORACLE_HOSTNAME=oem-
ORACLE_HOME=/oem/app/oraem/middleware/oms
TMPDIR=/oem/app/oraem/tmp
oraem@s11node2:~/.env$
oraem@s11node2:~/.env$ which emctl
/oem/app/oraem/middleware/oms/bin/emctl
oraem@s11node2:~/.env$
oraem@s11node2:~/.env$ emctl start oms
Oracle Enterprise Manager Cloud Control 12c Release 4
Copyright (c) 1996, 2014 Oracle Corporation. All rights reserved.
Starting Oracle Management Server...
Starting WebTier...
WebTier Successfully Started
Oracle Management Server Successfully Started
Oracle Management Server is Up
oraem@s11node2:~/.env$
At this point, we have proven that the OMS can be started successfully on the second node after the failover of oem-
The next step is to automate the startup of OMS during the failover procedures.